“Our sensation tells us something, we know that it may not be temperature. So what is the thing we sense?” Başer, 2006
What's this lesson all about?
The purpose of this lesson is to help students understand skin or touch cannot determine temperature; it can only tell you how quickly an object conducts energy towards you (feels warm) or away from you (feels cool). The lesson starts by exploring how our bodies interpret heat transfer, and by exploring the feeling of wooden and metal objects. Spoons are suggested for convenience. Students should learn how our bodies can send confusing messages about what is “hot” or “cold”, and how metal “feels colder” than wood, even at the same temperature. It is hoped that, by the end of this lesson, students will understand that:
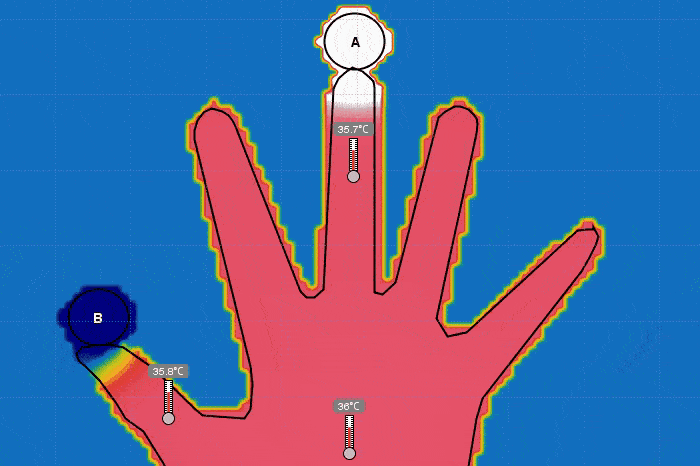
This lesson was designed after learning that many students, especially those in the 15-18 year-old range, believe that objects at room temperature that feel cold have different temperatures, and that some objects are naturally colder than others (Sözbilir, M., 2003). It was also common for students to believe that skin or touch can determine temperature and that perceptions of hot and cold are unrelated to energy transfer. 5 of the 26 questions contained on the TCE (Yeo & Zadnik, 2001) are related to these concepts, as seen below:
- our senses are not sufficient for determining temperature,
- objects transferring heat to or from our bodies are interpreted by our brains as “cool” or “warm”, and
- hot and cold is a perception, directly related to energy transfer.
This lesson was designed after learning that many students, especially those in the 15-18 year-old range, believe that objects at room temperature that feel cold have different temperatures, and that some objects are naturally colder than others (Sözbilir, M., 2003). It was also common for students to believe that skin or touch can determine temperature and that perceptions of hot and cold are unrelated to energy transfer. 5 of the 26 questions contained on the TCE (Yeo & Zadnik, 2001) are related to these concepts, as seen below:

The structure of this lesson is meant to help teachers facilitate a lesson with their students. Throughout, allow students to explore, to be curious, to ask questions! The lesson will look slightly different for every class, depending on the particular setting. Two physical introductory activities are offered; choose one, or both, depending on your preferences.
This lesson should take place after the TCE Pre-Test and, ideally, after Lesson 1 - Thermal Equilibrium.
This lesson should take place after the TCE Pre-Test and, ideally, after Lesson 1 - Thermal Equilibrium.
Introductory Physical Activity #1 - Hot and Cold... at the Same Temperature?
Materials: Wooden spoons or other wooden materials, metal spoons or other metal materials, thermometers (optional)
Extension #1: Provide students with thermometers to determine that the wooden and metal spoon are indeed the same temperature. Depending on the thermometer used it may be difficult to determine their temperature; infrared is best but more expensive. This whole step should be unnecessary if students understand from the previous lesson that the spoons are in thermal equilibrium with the room’s air.
Extension #2: Have students choose any other object in the room and measure its temperature. They touch it, describe its feeling in words. They choose a second object they think is colder, measure it, describe its feeling in words.
- Place wooden and metal spoons/objects around the classroom, making sure to leave plenty of time for them to reach room temperature. Suggestion - place sets of one wooden and one metal spoon around the classroom to ensure that they aren’t used by several students; students hands will warm the spoons and affect the activity.
- Have students, individually or in groups, pick up a wooden spoon, and the metal spoon, and describe the feeling of each. You can use a copy of this Google Doc to record results, or use paper.
- Could suggest “Cool, Warm, or Hot”, or have students describe the feeling on a scale from 1-10 where 1 is cold and 10 is hot, or whatever you feel is best for your particular students.
- Discuss the results in groups, if desired, eventually moving to a whole-class discussion. Focus on the sensation of the objects, and try to have them decide on what the temperature of each spoon might be.
- This is a great opportunity to relate back to the previous lesson by reminding them that the spoons were sitting in the room for a long time; they should be (and are) at thermal equilibrium when they come in contact with the skin.
- Ask, “can you trust your senses for measuring temperature?”, and have them explain and discuss their answers.
- Have students return to this activity at the end of the lesson to see how their views have changed.
Extension #1: Provide students with thermometers to determine that the wooden and metal spoon are indeed the same temperature. Depending on the thermometer used it may be difficult to determine their temperature; infrared is best but more expensive. This whole step should be unnecessary if students understand from the previous lesson that the spoons are in thermal equilibrium with the room’s air.
Extension #2: Have students choose any other object in the room and measure its temperature. They touch it, describe its feeling in words. They choose a second object they think is colder, measure it, describe its feeling in words.
Introductory Physical Activity #2 - Inner Conflict!
Materials: cold water, warm water, hot water, bowls
Teacher Support: When both hands are placed in the warm water, the hand from the hot water now senses the warm water as cold, and the hand from the cold water now senses the warm water as hot. You can suggest to students that the feeling of hot or cold has much to do with heat being transferred to and from the body.
- Put some hot water, warm water, and cold water in three separate bowls. Stations work well here.
- Just use water from a faucet, and be sure that the hot water is not too hot to touch.
- Have students place one hand in the hot water, and one hand in the cold water.
- After a few seconds, have them place them both in the warm water.
- Have students describe the sensations. Ask, “can you trust your senses for measuring temperature?”, and have them explain and discuss their answers.
Teacher Support: When both hands are placed in the warm water, the hand from the hot water now senses the warm water as cold, and the hand from the cold water now senses the warm water as hot. You can suggest to students that the feeling of hot or cold has much to do with heat being transferred to and from the body.
Teaching through T-GEM
|
If support is needed for using the Energy2D tool, please visit the “Teacher Support” section of this website.
The rest of this lesson plan is supported using the Energy2D simulation tool, and follows a structure guided by T-GEM (Khan, 2011). The procedure involves Technology at each stage and students taking part in the following cycle:
You can use the following plan as a guide for your own lessons. Please feel free to adapt/modify it for your particular group of students, supplement it with additional inquiry questions, and/or reduce the level of complexity. The end of this document contains suggestions for guiding questions to help students to think critically. Finally, you’ll find numerous references to having students compare data, results, predictions, and so on. This can be as informal or formal a process as you feel is best, but I have found it useful to keep track of data-driven lessons using Google Sheets. It allows large sets of data to be compared, and for students to collaborate easily. Feel free to use this template as a sample for how you may want to approach student-student collaboration. |
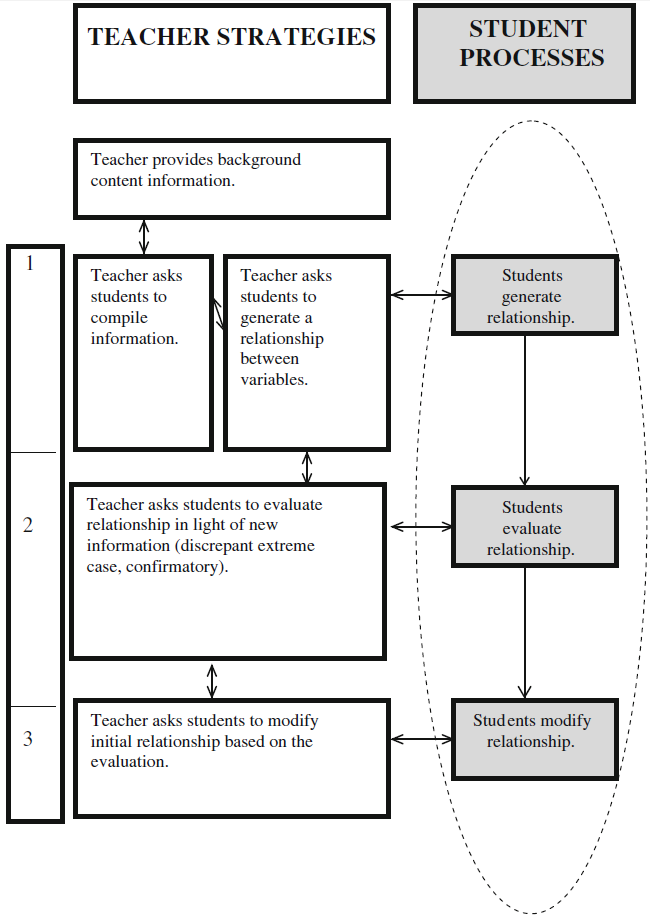
The T-GEM cycle (Khan, 2011).
|
Having trouble viewing the embedded document? Please view the Google Doc here, or download the lesson here.
Grand Takeaway
- Skin or touch is not enough to determine temperature,
- perceived hot or cold is related to heat transfer, and
- our bodies are great at determining heat transfer or relative temperature changes, but not absolute temperatures of objects.
Again, this lesson can be modified to suit your needs, as it covers a large breadth of material. Not every aspect of what’s explored above needs to be covered in-depth, but the teacher should ensure that students are questioned throughout the process. The lesson will be more effective if the teacher helps students make connections between the simulations and real-world analogies or situations.
Additional Teacher Guidance
Here are some questions or prompts you can use with your students before, during, or after the lesson. Students should be encouraged to use examples from “real-life” as well as the simulations to support their responses to the questions below.
Having trouble viewing the embedded document? Please view the Google Doc here, or download the lesson here.
The next lesson is Lesson 3 - Cups 'n' Convection.
|
Return to the previous page.
|
Continue to the next page.
|
Notes:
- Please forward any feedback you have on this lesson to [email protected]. I’d love to hear what you liked, what you didn’t, what worked, what didn’t, or any modifications you’ve made!
- All Energy2D files (.e2d) must be downloaded and opened in Energy2D before they will work.
- The team behind Energy2D is working on a more web-friendly version of their simulations. At the time of this writing this didn’t exist, so Java was begrudgingly used because of the benefits of the tool.
- Until a mobile-friendly version of the tool exists, students should each (or in groups) have a computer/laptop/tablet that can run the software.